Tools and techniques for digital animation

Animation:
Juaco Garin

Introduction

Jumping character

In this article, learn how to create 2D animations as well as techniques to make your animation movements more effective.
You can also learn about apps and features recommended for creating 2D animations, as well as community and learning resources for making full use of these features.

2D Animation Techniques

There are two main types of 2D animation techniques: frame-by-frame animation and keyframe animation. These involve using an animation timeline to set the movements of the animation.
The tool names and definitions may differ slightly depending on the animation app used.

Frame-by-frame animation

This is a method in which pictures are drawn one by one for each frame. In the most basic form, the principle is the same as a flip book, where you draw each motion on a sheet of paper.
Recently, there has been a movement toward paperless animation, which is made using animation software such as Clip Studio Paint.
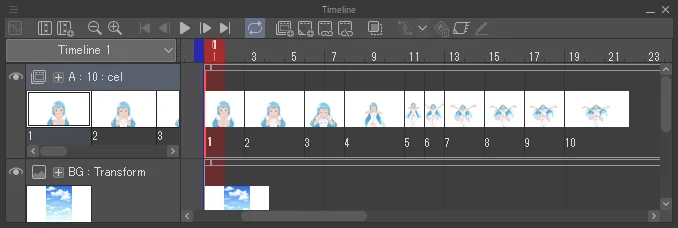
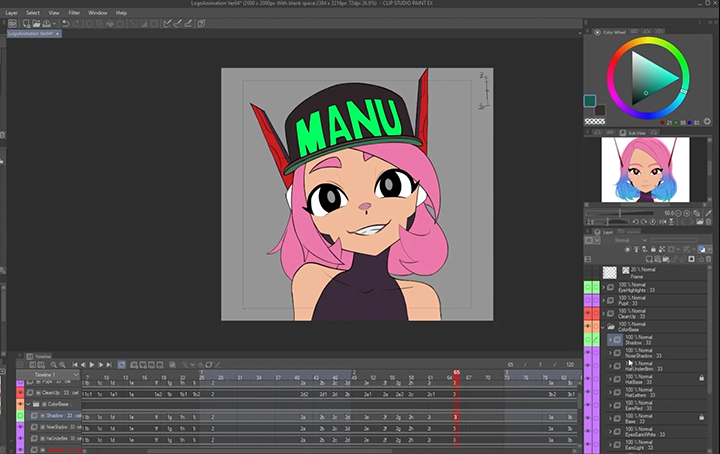
You draw images in the application and create motion by deciding when to show each image on the timeline.

Frame-by-frame timeline

With the principles of frame-by-frame animation, you can create the following types of animation.

Stop motion animation

Common with clay animation or puppet animation, you take photos of a puppet while moving it little by little, then arrange the photos one by one on the timeline to create motion.

Digital cut-out animation

This is a common technique in animation that involves splitting the elements into parts and moving them separately. For example, you can separate the character's eyes and animate a blink to add motion to the image without having to redraw the entire picture. This streamlines the process of frame-by-frame animation.
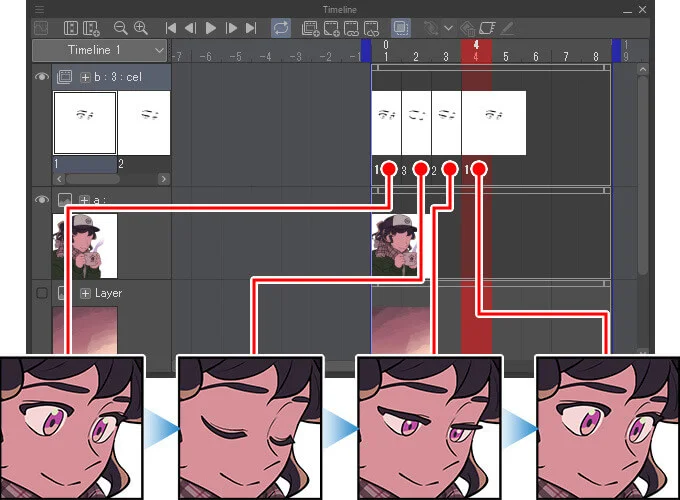
Digital cut-out animation timeline

Keyframe animation

This is a digital technique commonly used in animation, film production, and video editing.
Keyframes allow you to save changes such as effects, object placement, camera position, and so on. To animate them, you need to create keyframes that record the effects at the start and end points.
When you play an animation with keyframes, the movement of intermediate frames is interpolated to transition between the set start point to the end point, also called a tween animation. This creates movement in the image.
Therefore, you do not need to set keyframes for every frame. Keyframes also affect how the tween animation moves. You can make the movement smooth and even, or move at a varying pace.
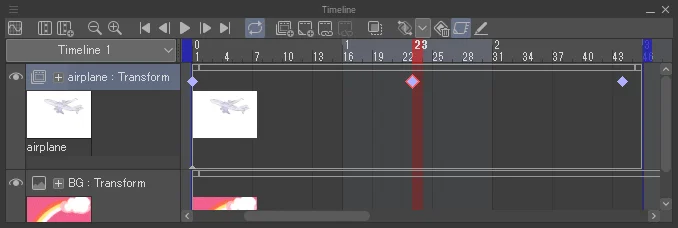
In the following animation, the plane’s position is moved and saved to three keyframes. With keyframes, this animation is possible with just a single drawn picture.

Animation of a plane flying from right to left
Keyframe timeline

Keyframe animation is suitable for creating effects, and can be used for typography animations that move text, as well as motion graphics that combine illustrations and audio to convey a message.
Animation production with keyframes is also used in 3D animation. Just like cut-out animations, you can create animations by recording the settings for moving 3D parts in keyframes. There is no need to create an image for each frame as in stop motion animation.

Master animation techniques

We have covered how to create 2D animations such as frame-by-frame animation and keyframe animation. Here we will introduce 2D animation techniques to bring extra spark to the action and movement of your animations.

Squash and Stretch

This is a technique that expresses weight and flexibility by incorporating the principles of expansion and contraction when moving characters and objects. The following image shows the frames for a bouncing ball animation. By drawing the ball so that it squashes when it hits the ground, you can express the impact on the ball when it touches the ground.

Squash and stretch

Anticipation

Anticipation is the action that a character does before a main action. For example, when people jump, they first crouch and bend their knees. This is anticipation. By adding anticipation drawings in your animation, you can express more realistic movement. This is an important technique for character animation.

Anticipation

Slow in and slow out

When moving things, be aware of the timing and spacing of your animation. One such technique is slow ins and slow outs. When a moving object gradually slows down as it comes to a stop, this is called a slow in. On the other hand, when something gradually accelerates as it starts to move, this is called slow out.
If something is meant to move faster, show a greater distance between the stages of movement across frames. To show a slower motion, have more in-between frames with a shorter distance between each stage of the movement. With keyframes in animation software, the further that two frames are placed from each other on the timeline, the more time passes between the two stages of movement.

Slow in and slow out

With a little effort, you can make the movements more realistic and improve the quality of your animation. The techniques introduced here are just a few examples. For more animation principles, see “The 12 Animation Principles.”

Software tools and features

Let's consider animation tools to create animations from now on.
There are various animation tools that can create 2D animations, but Clip Studio Paint is recommended. In Clip Studio Paint, you can not only draw frames, but also add settings such as camera work and audio. You can also create keyframe animations as introduced in "2D Animation Techniques".
Next we will explain some useful functions for creating animations in Clip Studio Paint.

Ease of drawing

Animation projects require a lot of drawing. With Clip Studio Paint, in addition to the default brushes, you can use Clip Studio ASSETS to download additional custom brushes, allowing you to choose brushes that match your personal style.
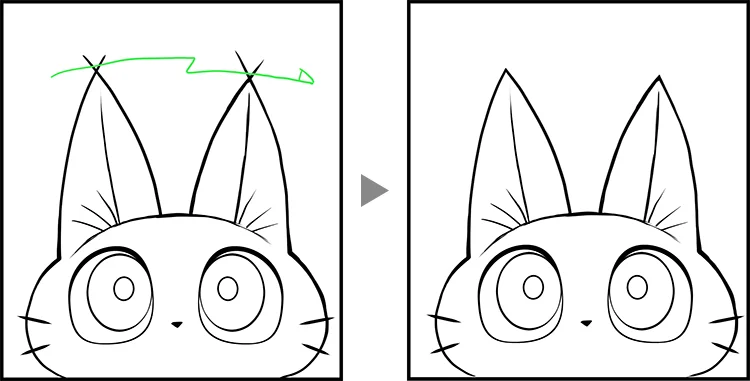
You can draw on vector layers, so you can freely adjust the thickness of lines and transform them later. Line quality also does not deteriorate even when you resize them. Plus, the vector eraser is convenient for erasing lines up to where they intersect. See here for convenient uses of vector lines.

Ease of drawing

Onion skin

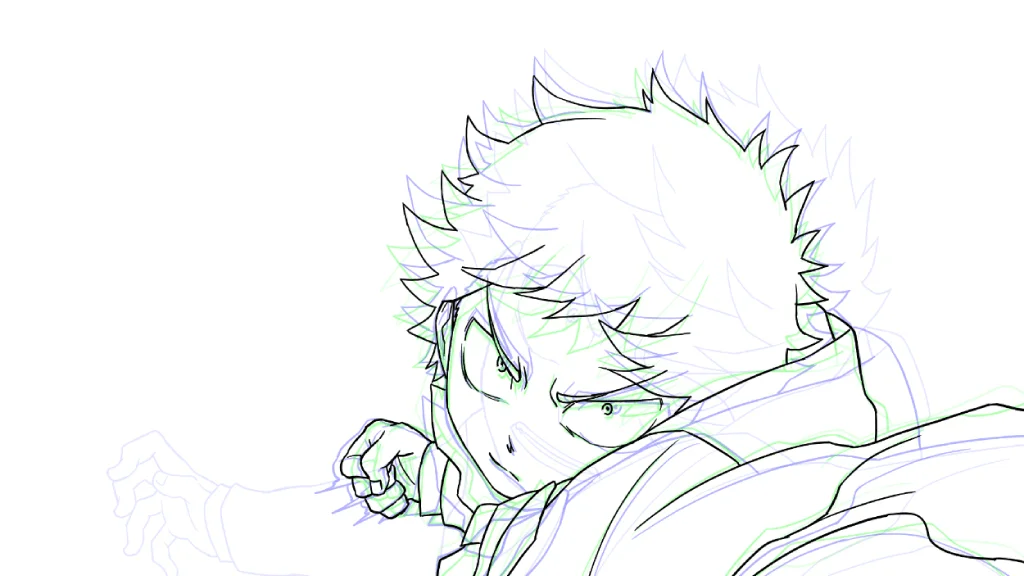
Onion skin is a function that shows images from multiple frames at once. You can display the images before and after the current frame in semi-transparency to use them as reference when drawing.
The name comes from the fact that in the era of traditional animation, drawings were made on paper as thin as an onion skin. Thin sheets of paper were layered on a light table, so that adjacent drawings would show through as a reference for the current drawing.
By using onion skin, you can improve consistency in your animation drawings and be more efficient.

Onion skin

Digital coloring

With the flat fill tool, you can fill closed areas with just one click. This helps to fill in small gaps without any problems. If you want to fill multiple closed areas with the same color, simply drag the area to fill them all at once.

Variety of layer effects

Layer effects let you apply color effects to your scene. Color effects are an important element in creating the atmosphere of a scene.
Tonal correction layers allow you to apply color effects without changing the original layer. By using layer masks with tonal correction layers, you can easily limit the area in which the effect is applied.

Layer management

Animation production involves a lot of images and frames, so the number of layers often increases to more than a thousand in no time. Inexpensive digital art apps, such as those used for creating simple GIF animations, may limit the number of layers you can use, so you may not be able to express your animation fully.
Clip Studio Paint has an upper limit of 10,000 layers per file, so even complex animations can be created without problems. Even if the number of layers increases, you can use the Search Layer palette to search for layers by layer type and settings. With Clip Studio Paint EX, you can also search by entering the layer name.
Clip Studio Paint is recommended for people who usually draw illustrations and want to try drawing animation. You can manage animation layers using the same Layer palette as for regular illustrations, helping you to create animations with a familiar interface.

Camera movement

The 2D camera folder allows you to set camera movements with keyframes. There are multiple interpolation options, so you can sharp or smooth movements and while checking the movement in the camera path display.
You can add effects such as moving the camera frame, panning horizontally, zooming in or out, and so on.

Example of animation with camera movement

Audio

Clip Studio Paint can import audio files such as MP3. Add background music, dialog, and sound effects to your animation. Playback audio tracks on the timeline to match animation and sound and also set the playback volume using keyframes.

Many export formats

Animations created with Clip Studio Paint can be exported as animated GIFs that are easy to share on social media. You can also export movie files with audio in formats such as MP4. The available export formats depend on your operating system. Please refer to the system requirements for details.
You can also export each frame as sequential images to edit them in other apps, or export them for OpenToonz.

Community and learning resources

The animation community is a treasure trove of knowledge and resources. Online animation communities and forums provide opportunities for beginners and experienced animation creators to connect. As part of the art community, you can ask others for advice and share your work.

Community and learning resources

The official tutorials and community are useful for learning how to use Clip Studio Paint.

Clip Studio TIPS

Clip Studio TIPS not only offers animation tutorials for beginners, but also many step-by-step animation process breakdowns by Clip Studio Paint users. These are helpful when you’re starting to animate for the first time with Clip Studio Paint.
There are also courses taught by professional animators. In “Japanese Animation Style,” a Japanese animation studio introduces the basic digital animation workflow using Clip Studio Paint.

Clip Studio ASK

Clip Studio ASK is an official community where users can ask and answer questions. This is a helpful community when you are confused about how to use a function or want to ask others for tips.

Sample data

Clip Studio Paint distributes sample data created by professional animators for free. By actually opening the project in your app, you can get tips on how to create your own animation. Anyone who has the trial version of Clip Studio Paint can open the files to see how they’re made.

Official YouTube Channel

On Clip Studio Paint's official YouTube channel, you can learn how to use Clip Studio Paint through videos.

All of the services shown above can be accessed for free. By taking advantage of these free animation resources, beginners can learn the basics of animation without spending a lot of money.
Besides official courses, YouTube has several channels dedicated to digital art and animation. Just search YouTube for "Clip Studio Paint animation" to find videos that teach you how to create animations.
By narrowing down your search terms, you can view high-quality animations created by amateurs on YouTube and other social media. Before starting your own animations, it may be a good idea to look at animations created by hobby artists. It's difficult to create professional-looking projects on your first try. One trick to improving your skills is to start with something easy.
If you want to learn more, consider using paid animation resources. You can also consider learning directly from professional animators at animation workshops.

What Artists Are Saying About Clip Studio

Juaco Garin
Director & Producer
Argentina
[The] drawing tools feel very real and the animation interface is strongly based on the procedures of traditional animation
kami
Illustrator & Animator
Philippines
CSP is really made with the artist in mind
Okamoto
Animation Director & Illustrator
Japan
It's… amazing for my animation process, as I can work in the same software and tools I'm used to

CLIP STUDIO PAINT PRO

for character art, concept art, illustration

Windows/macOS/iPad/iPhone/Galaxy/Android/Chromebook

Windows/macOS/iPad/iPhone/Galaxy/Android/Chromebook

Windows/macOS only

CLIP STUDIO PAINT EX

for comics, manga, webtoons & animations

Windows/macOS/iPad/iPhone/Galaxy/Android/Chromebook

Windows/macOS/iPad/iPhone/Galaxy/Android/Chromebook

Windows/macOS only

PRO

EX

Single-page illustrations & comics

Multi-page comics/manga & illustrations

Up to 24 frames for gifs or short animations

Unlimited frames for professional animation

Natural, customizable pen and brush tools

Vector layers

More than 10,000 free downloadable brushes and materials

3D models and drawing figures

PSD compatibility

RGB and CMYK compatible

For macOS and Windows

-

Export and print multi-page files

-

Convert images and 3D models into lines and dot shading

Free technical support

Free web services & community
Clip Studio Ask / Assets / Tips / Share