Why are the 12 principles of animation important?

Understanding the 12 principles of animation is important for anyone working in animation in order to bring life to animated characters and objects. Although some principles have become second nature to animators, keeping each of them in mind will make your animations more visually appealing, compelling, and lifelike.
In this article, we’ll introduce the 12 principles and provide tips for implementing them in your 2D animations using digital tools like Clip Studio Paint. Start by practicing with simple projects such as a bouncing ball, a character walk cycle, or animating an illustration you already have.
The 12 Principles of Animation
Disney animators Ollie Johnston and Frank Thomas first introduced the 12 principles of animation in their book, “Illusion of Life: Disney Animation.” Based on techniques used in Disney animation studios since the 1930s, these teachings were originally intended for traditional hand-drawn animation but remain influential for all kinds of digital animation.
Let's take a look at the 12 principles of animation one by one.
1. Squash and stretch
Squash and stretch is one of the most important principles, used to express an object’s weight and flexibility when moving. For example, when an object is moving through the air, it may stretch out to become thinner and longer to express movement, and then flatten and widen when it hits an object. Keep in mind that the overall volume of the object must stay the same when using squash and stretch.
This principle can also be applied to facial expressions for an exaggerated effect.

How to apply squash and stretch: This principle is easily understood with a simple bouncing ball animation. Try using onion skin in animation apps such as Clip Studio Paint to see adjacent frames at once and check that the object’s volume stays consistent.
2. Anticipation
Anticipation refers to a small moment that prepares the audience for an upcoming action through subtle action. This can be something like a sports player pulling their arm back before throwing a ball, or a character looking off-screen before another character arrives.
Adding anticipatory moments to your animation makes the sequence of events appear more natural and fluid. Without anticipation, animations may appear abrupt or awkward.
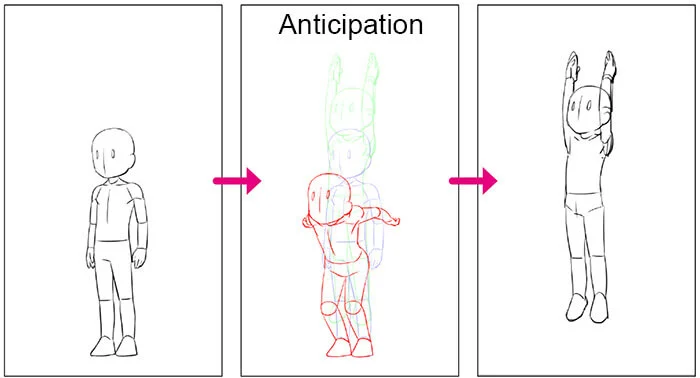
Tips for anticipation: Plan anticipatory actions in the storyboard stage so that you can manage the timing and impact of your completed animation. Study from real-life video references rather than static images to see the full transition of a movement from anticipation to follow-through.
3. Staging
The staging principle in animation is much like staging for film. This refers to directing the audience’s attention on the screen to highlight the main point of focus. An understanding of framing and composition is essential for this principle.
For good staging, use motion to guide the audience’s eye and minimize distractions in the background. Light and shadow, the placement of focal characters, and the angle of the camera all help to create clear staging.

Tips for staging: Try using the 2D camera to keep focal characters in the center of the screen even when they are traveling. You can also apply separate layer effects to your background if you find it distracting from the foreground movements.
4. Straight ahead action and pose to pose action
Straight ahead action and pose to pose action are two approaches to animating movement. Straight ahead action refers to animating the frames in consecutive order. This can lead to a more spontaneous and organic feel, but can also be harder to control the framing or proportions.
Conversely, pose to pose is the process of first drawing keyframes such as the first and last pose as well as specific key moments, then filling in the gaps (“in-betweening”) later. This method is useful for scenes where you want more control over the composition, such as emotional or dramatic scenes.
As an animator, you will typically use a combination of both methods depending on the object being animated.
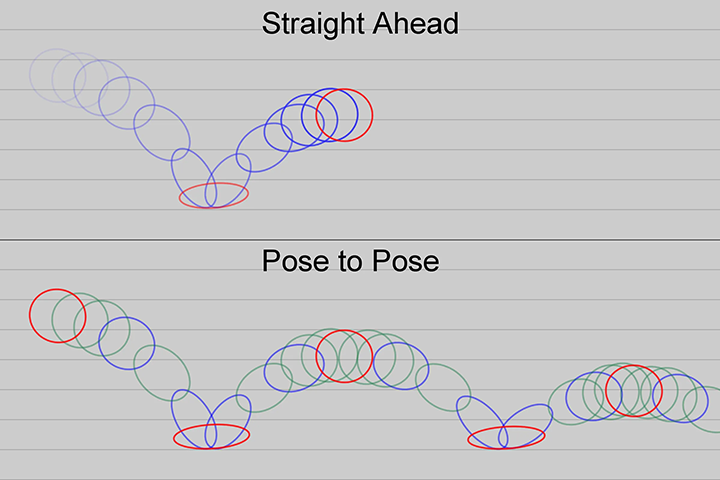
Tips for straight ahead action and pose to pose action: Use onion skin and light table features in Clip Studio Paint to check the surrounding frames, regardless of whether you’re keyframing or animating straight ahead.
5. Follow through and overlapping action
Follow-through and overlapping action are principles to make your animation appear more complex and lifelike, incorporating the principle of inertia.
Follow-through describes how lighter parts of an object keep moving after the character has stopped moving, and will then fall back to the center of mass. For example, how a character’s hair or loose clothing may sway forward when a character stops running.
Overlapping action refers to how parts of a character move at different speeds. For example, when walking or running, a character’s hair, head, or arms may move at a different rate from their legs.
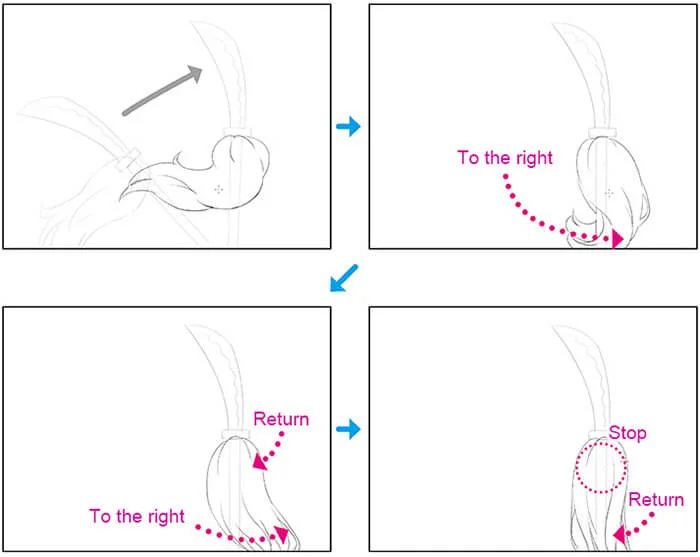
Tips for follow through and overlapping action: Separate parts of your character onto different layers so you can animate them separately and control the timing of each part in the Timeline palette. If you end up with a high volume of layers, use palette colors or layer colors to organize and manage your project.
6. Slow in and slow out
Slow in and slow out is a principle related to expressing momentum. As an object gains and loses momentum, the start and end of a motion will typically be slower than the middle.
You can express this in animation by adding more frames at the start and end of the motion. Closely spaced frames make a motion appear slower, while wide spacing creates the effect of rapid motion.
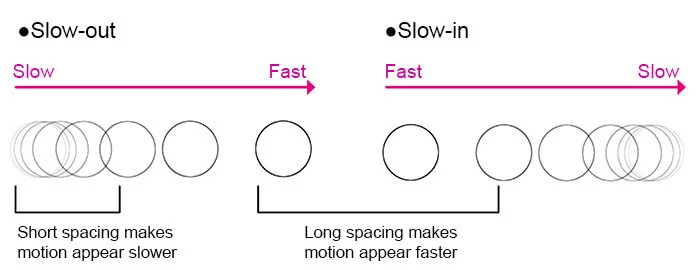
Tips for slow in and slow out: Use the Timeline palette to add frames and manage the timing of your animation. You can change the spacing of frames to adjust the timing.
7. Arc
Most objects in real life move in a curved trajectory like an arc due to the effects of gravity or center of motion. To achieve natural-looking movements, imply an arched path of motion in your animations.
Exceptions include mechanical motions, which typically move in straight directions, and very fast motions, as the arcs for fast-moving objects tend to flatten out.
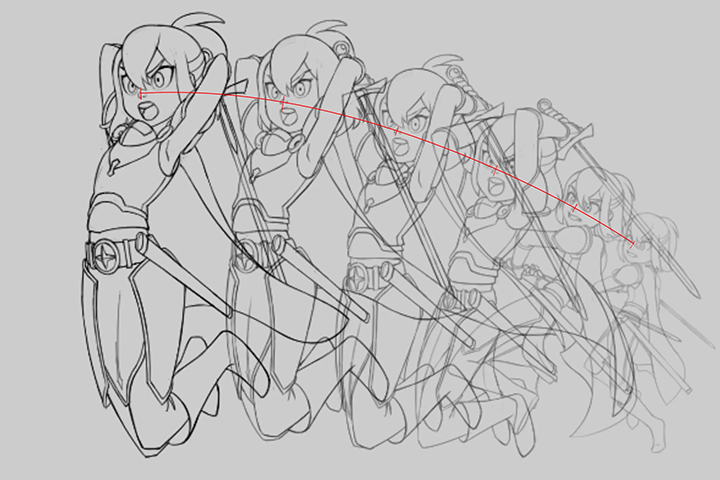
Tips for arcs: In order to keep the motion within a natural arc, you can draw a guideline for the arc when creating your storyboards. Set your guide layers as draft layers so they don’t appear in the exported animation.
8. Secondary action
Secondary action is the principle of adding motions that support the primary action resulting in a more energetic and nuanced animation.
Secondary actions can reflect physical motions such as the wind moving a character’s hair, or reinforce the character’s emotions in a scene. These small motions shouldn’t distract from the primary action but complement and complete the overall scene.
Tips for secondary motions: As with overlapping motions, keeping the parts of your character on separate layers will help you add and adjust secondary motions.
9. Timing
Timing refers to the number of frames allocated to a specific action. More frames create the effect of a slower motion, while fewer frames make character movements look more rapid.
When arranging the timing for each part of your animation, use references to find the correct timing.

Tips for timing: Use the Timeline palette to manage the spacing of frames and adjust the speed or timing of each motion.
10. Exaggeration
While realism and adherence to the general rules of physics are important, the exaggeration principle reminds us to bring more energy and action to animations by exaggerating characters and objects.
Too much realism can make animations seem dry or boring, so find ways to exaggerate your drawings in your character’s design, expressions, or motions.
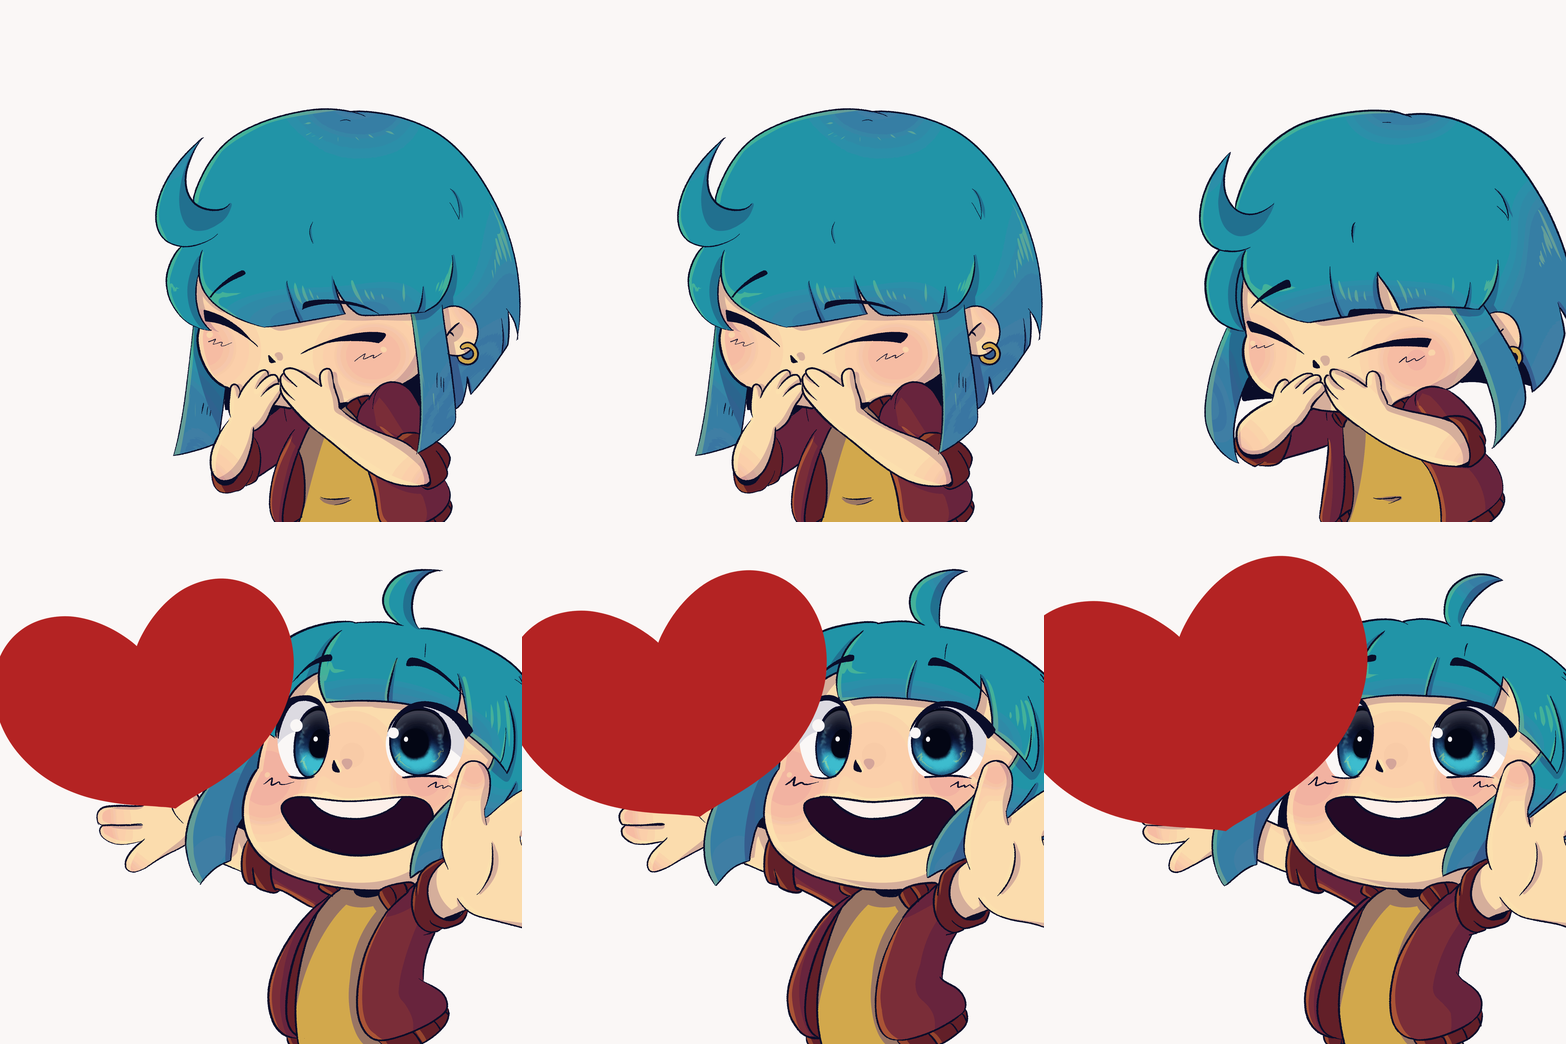
Tips for exaggeration: There are many ways to apply the principle of exaggeration in your animations. You can combine this with other principles such as more overstated squash and stretch or arcs of motion. You can also exaggerate the character designs themselves with enlarged features.
11. Solid drawing
Solid drawing refers to making your animations act as if they have appropriate substance, weight, and volume when interacting with 3D space. This is especially important for key poses. When planning your character’s movements, think about how the character’s form and center of gravity influence their movement.
Tips for solid drawing: Before starting your animation, design characters with convincing form and think about how they will interact with three-dimensional space believably. Drawing your characters in a turnaround and various poses can help you familiarize yourself with their form and be ready to animate them realistically.
12. Appeal
Appeal is the principle of making your characters charismatic and entertaining. This can be achieved not only through character design but also their expressions, mannerisms, and way of movement. No matter the genre, make sure your characters are compelling and interesting for your audience to watch. This even applies to villains and side characters - don’t focus all your efforts on the main character alone!

Tips for appeal: See our article on character design for tips on creating appealing characters. You can also practice drawing your characters in different key poses or expressions to think of ways to maximize their appeal.
Now you know the 12 animation principles! Get started with Clip Studio Paint’s free trial to try these out in your own animation projects and level up the charm and appeal of your animations.
What Artists Are Saying About Clip Studio
CLIP STUDIO PAINT PRO
for character art, concept art, illustration
CLIP STUDIO PAINT EX
for comics, manga, webtoons & animations
Clip Studio Paint PRO/EX Comparison
| Feature | PRO For professional illustration |
EX All PRO features + animation and comic features |
|---|---|---|
Illustration (Character art, concept art, etc.) |
||
Import/Use 3D models |
||
Extract lines from images and 3D models |
||
Save layer comps |
||
Single-page comic tools |
||
Multi-page projects |
||
Webtoon tools |
* | |
PDF/Ebook export |
||
Simple animation/movie creation |
||
Full-length animation tools |


