Anime-Style Skin Coloring Tutorial
In anime-style character illustrations, the way you paint the skin is important for bringing out your character's appeal! Use soft blush, highlights, and shadows to create a three-dimensional effect. Artist Nanniimo explains the steps in detail.
Index
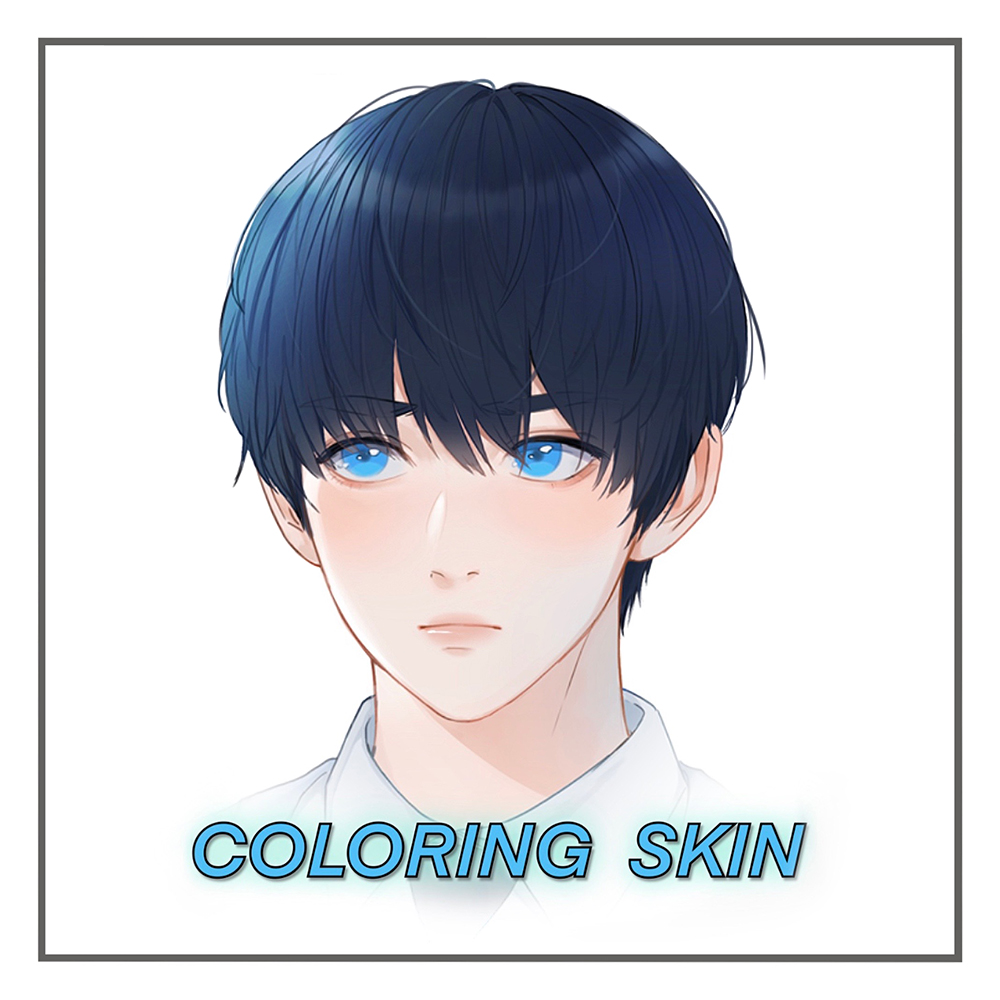
Introduction
Coloring skin is one of the most important parts in a drawing! It can be very hard sometimes, especially if you can’t choose the right colors and tools for it! That’s why I decided to make a small tutorial showing how I color skin using Clip Studio Paint. I hope you enjoy the tutorial and find it helpful!
Color Palette
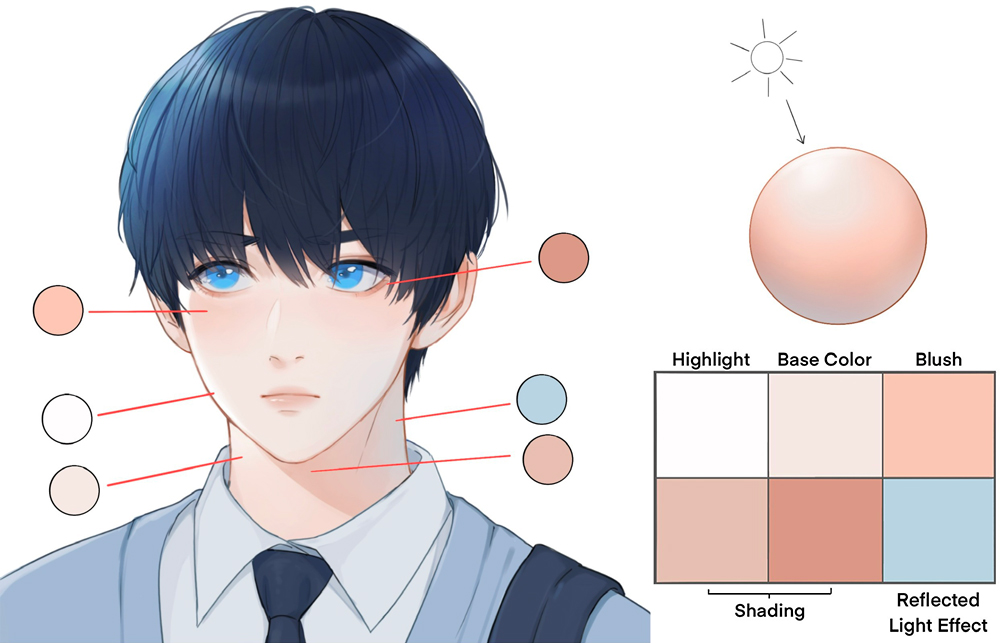
Skin has way too many tones. It can be very light, very dark, or somewhere in between! I usually use light-reddish color tones for my drawings, so I decided to choose this palette for today’s tutorial as well.
The following picture shows which colors are used for what part in the face. I will be explaining more about them later!
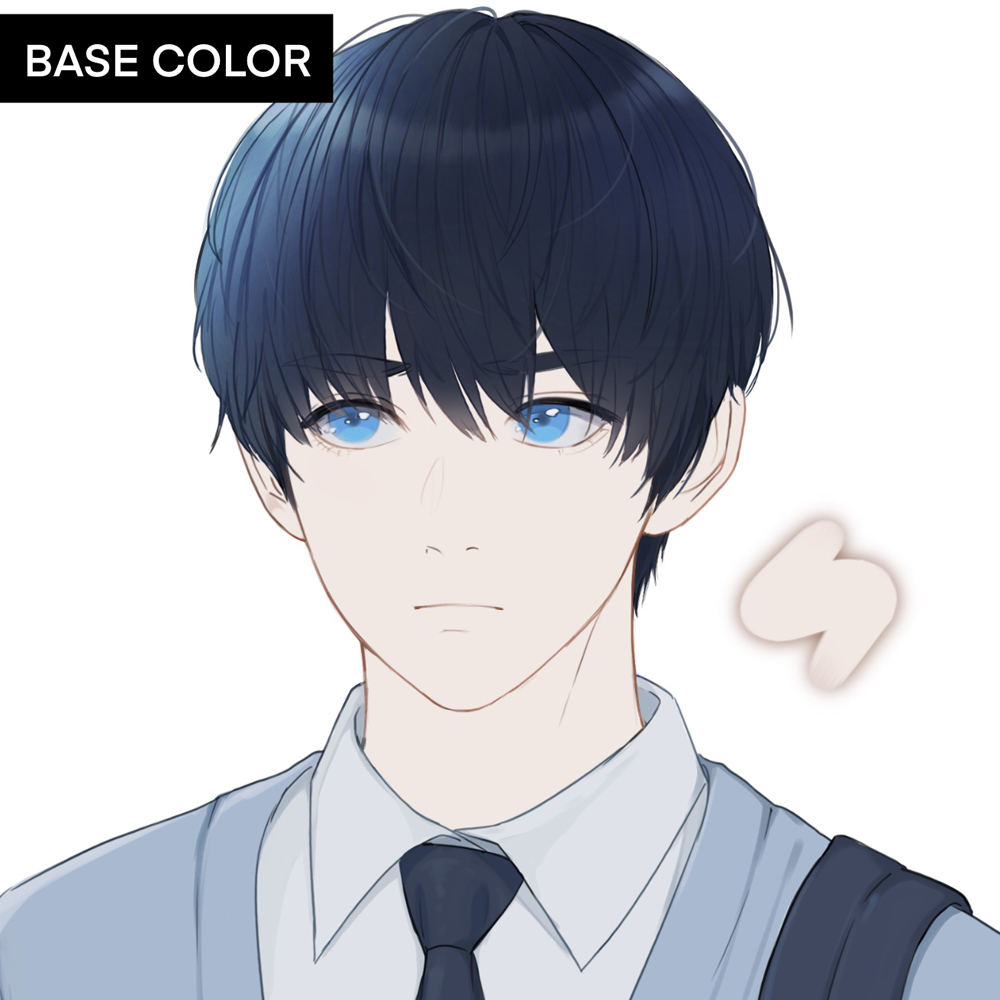
Base Color
Fill the area you want to color skin in with the base color first! Make sure you don’t color outside your lines.
The base color should be brighter than the final skin tone that you want to have. This is because we will add darker shading later!
Step 1:
Create a new folder (SKIN) and add a layer (BASE) to it.
Make sure to keep the Skin folder at the very bottom, because we want to color under the lines and not over them.
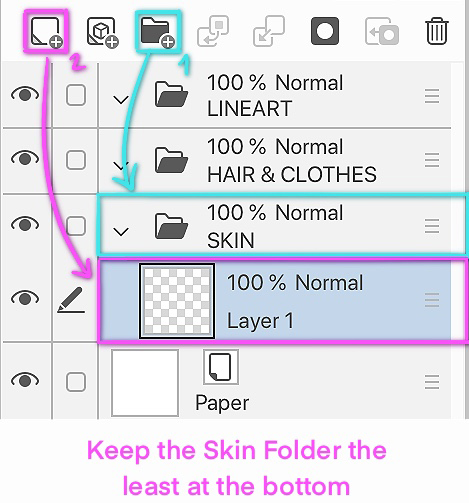
If you give your folders and layers names, it will be easier and faster for you to find your layers.
Step 2:
Choose your tool. For the base color, I use Turnip Pen on 100% Opacity. There are many other brushes that you can use. These should be hard brushes so you can color the area completely without leaving any transparent areas.
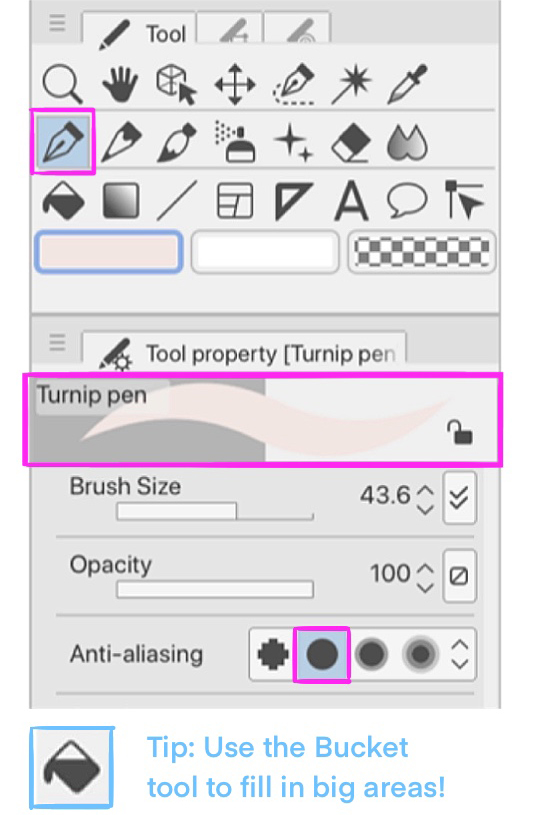
Step 3:
Pick the color and fill the area.
Shading
To be able to shade, you have to ask yourself: where should the light come from?
For this tutorial, I want the lighting to come from above on the left corner.
Step 1:
Create a new layer (SHADING) above the first layer (BASE)
Click on the icon for Clip at layer below. This will confine the coloring inside the base color area only, which makes the coloring easier without worrying about it going out of the lines!
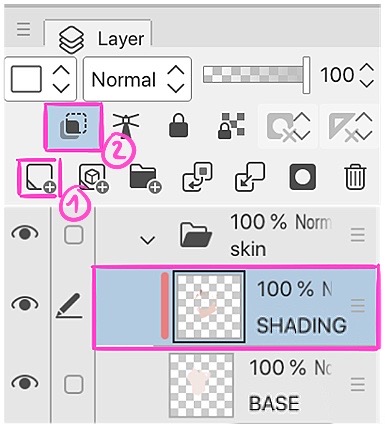
Step 2:
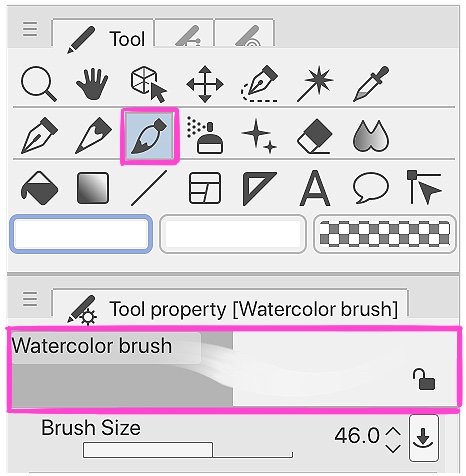
Choose your tool. For the shading part you can choose whatever brush you’re comfortable using! I personally enjoy using the Watercolor brush the most.
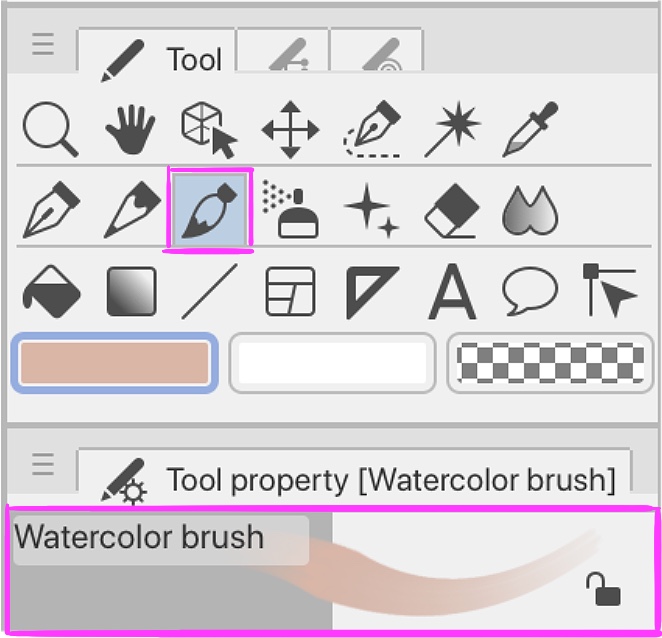
Step 3:
For shading, it’s always good to use more than one color. It will make your drawing more pleasing to look at and less boring!
The colors you choose for shading should be darker than the base color.
Usually, I use two tones and sometimes mix between them to create more tones.
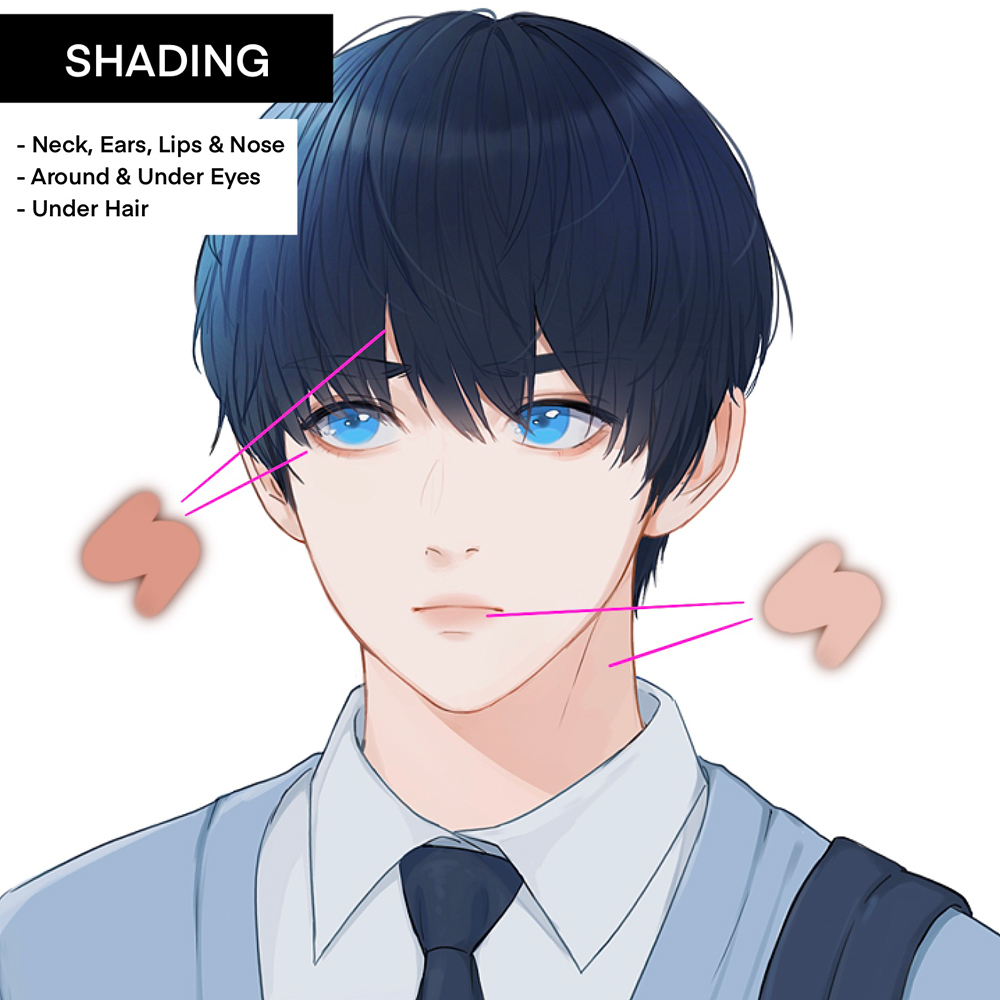
Areas I add shading to:
- On the eyes: First I use the bright tone around the eyes and then add the darker tone on the top and bottom eyelids
- Under the nose
- On the lips: I like coloring the lips darker from the middle and brighter toward the edges, this will make the lips look very soft
- On the nose: I use the bright tone outside the ears and dark tone inside
- On the neck: The light is coming from the left, which means the shading should be on the right side of the neck
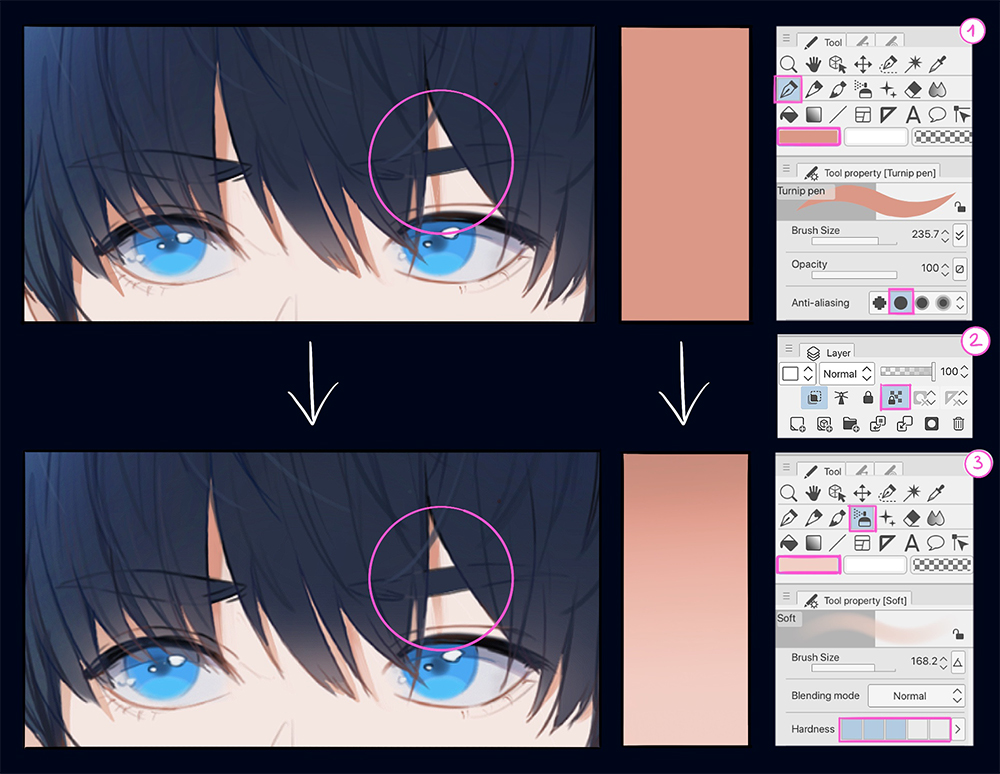
- On the forehead under the hair: I will explain this part in the next picture.
- Using Turnip pen in a dark tone, I draw the shadow under the hair
- Lock the layer
- Using Soft Airbrush in a light tone, I color the bottom part of the shadow to make it look more realistic
Blush
Blush makes your drawings look softer and cuter. You can add it on any part of the body depending on your style!
Examples:
- Cheeks (most common)
- Nose
- Elbows
- Knees
- Fingers
- Shoulders
Step 1:
Create a new layer (BLUSH) over the previous layer (SHADING)
Click on the icon for Clip at layer below.
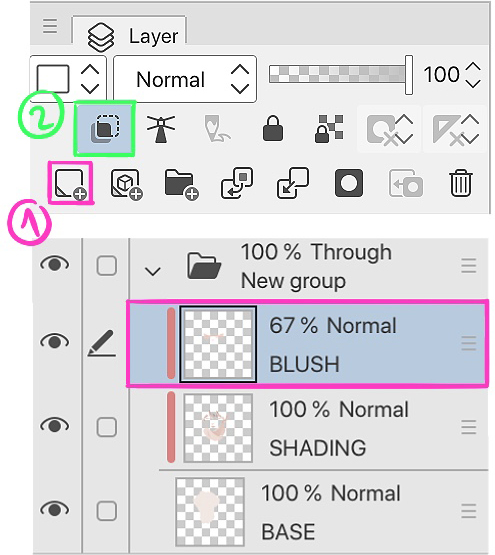
Step 2:
Pick the color. For blush, I like using light reddish tones.
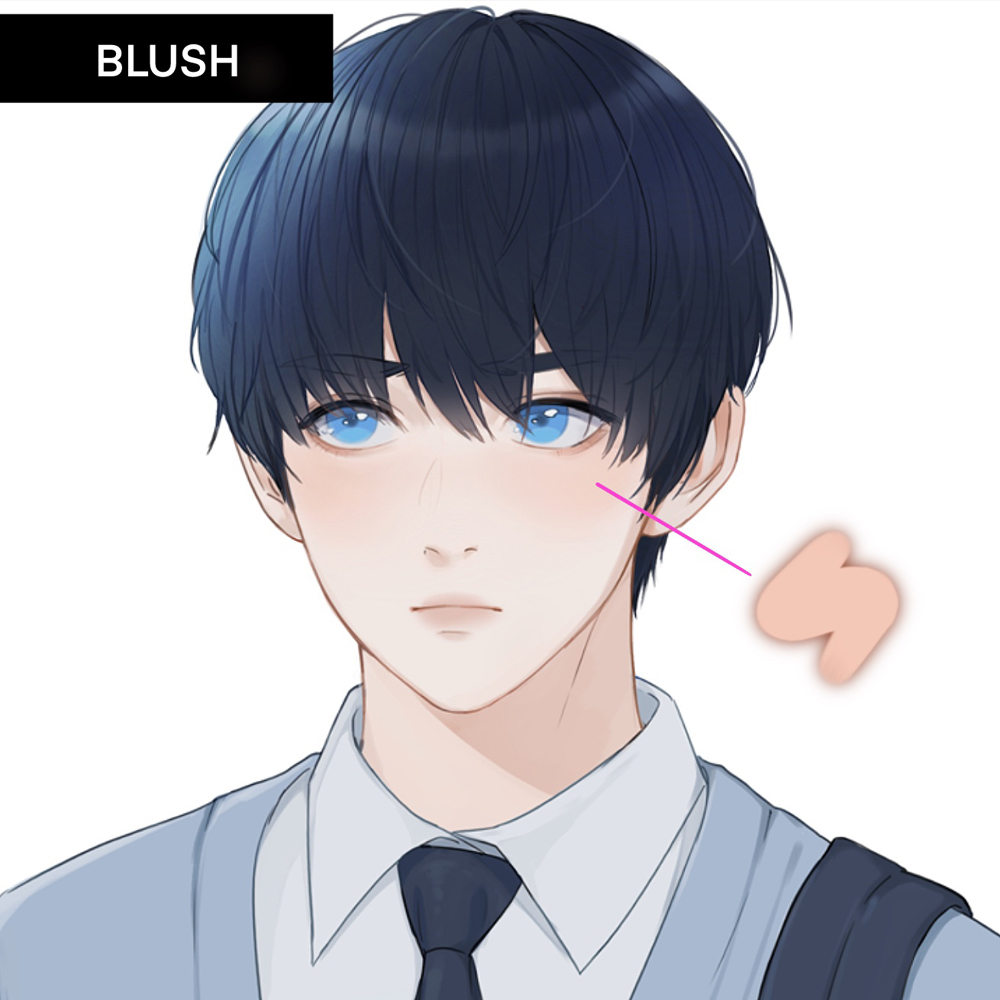
Step 3:
Choose your tool. I’ll use the same Watercolor Brush as for shading!
Add some blush on the cheeks and any other parts you like
Using the Blend tool, try to smudge it from the edges only to make it look soft. (Advice: the bigger the brush is, the faster and cleaner it blends.)
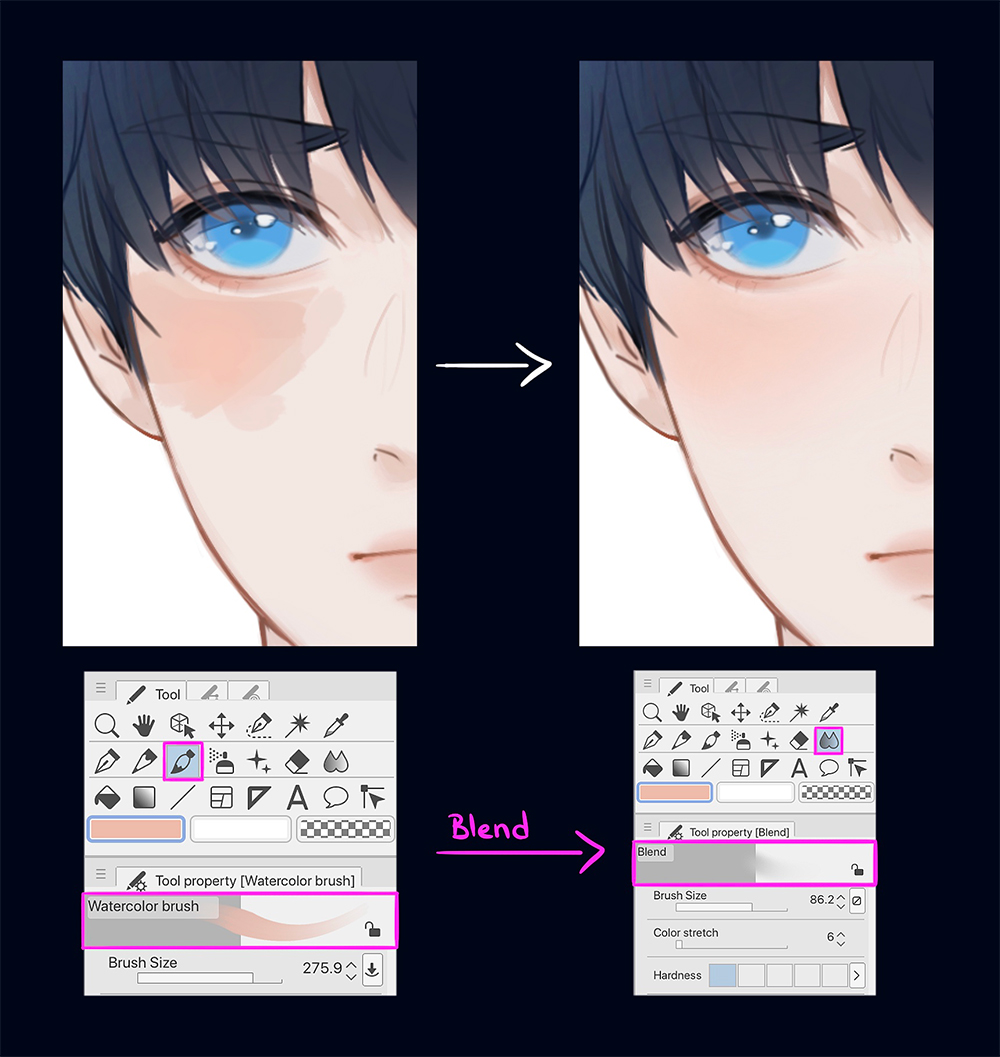
Highlights
If your drawing has shadows, that means there is a light too! That’s why we add highlights, which gives the skin a soft glow!
Step 1:
Create a new layer (HIGHLIGHT) above the previous layer (BLUSH)
Click on the icon for Clip at layer below.
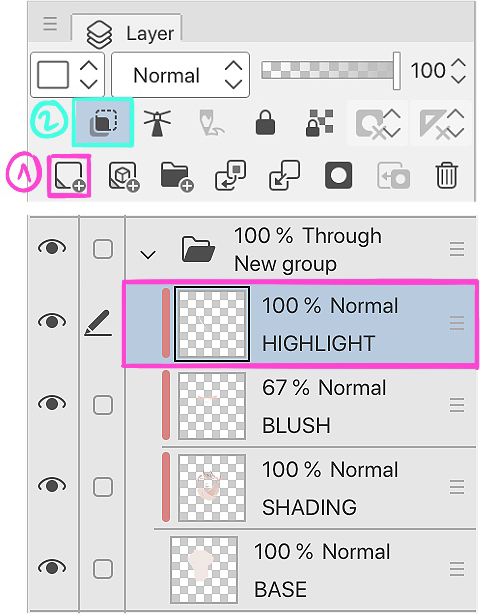
Step 2:
Pick the color. For highlights, I personally just use a whitish color for this type of skin tone! For darker skin, white will look very bright, so I would go with light pink or brown tones instead.
Step 3:
Choose your tool. I’ll use the same brush again which is Watercolor Brush.
You’re free to use any brush you’re comfortable with. It always depends on your style. If you want the drawing to look smooth, use soft brushes. If you want it to look sharp, use hard brushes.
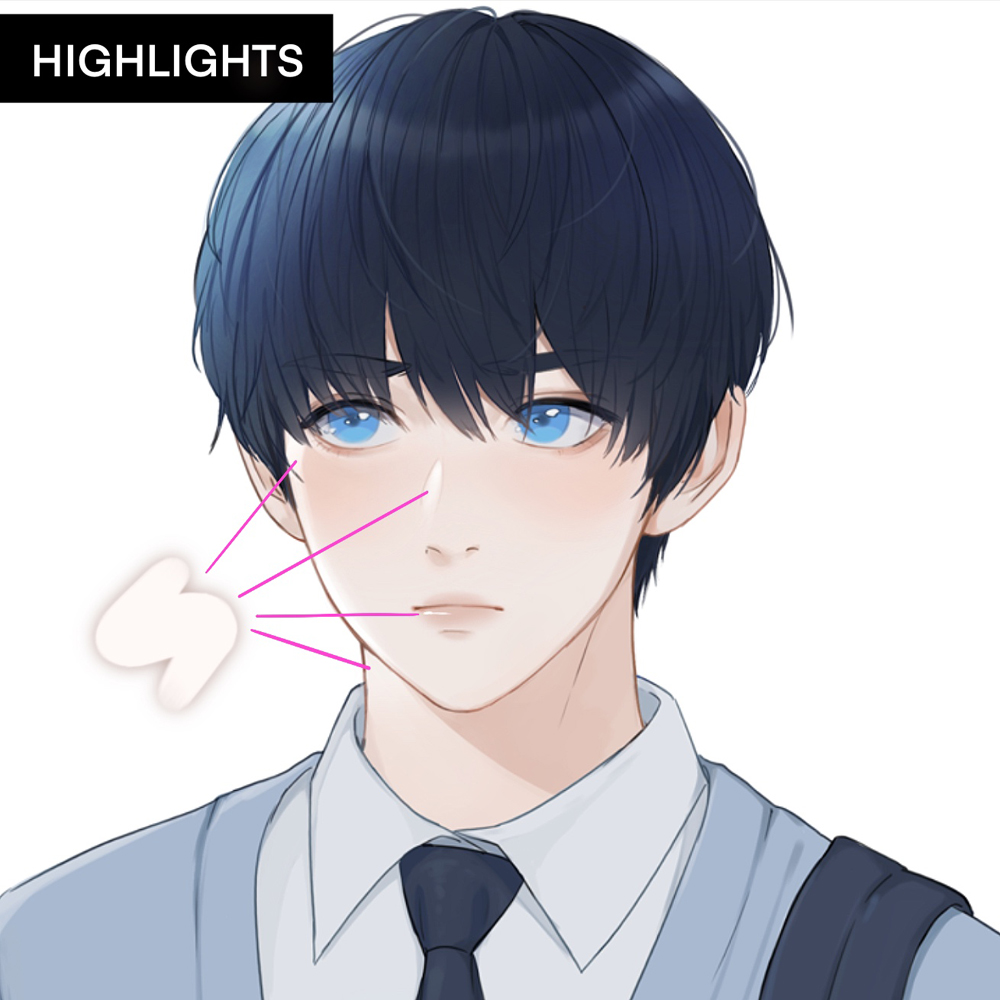
Add the highlights on the parts where the light comes from. For this drawing, the light is coming from the left.
I put highlights on the nose, cheeks, lips, and neck.
You can also use the Blend tool to blend some parts if needed.
Reflected Light Effect
To make your drawing more realistic, it’s always nice to put reflected lighting on it. This appears in the darkest shadows, caused by refracted light from nearby surfaces. The color depends on the environment, such as clothing, objects, and even the sky.
Step 1:
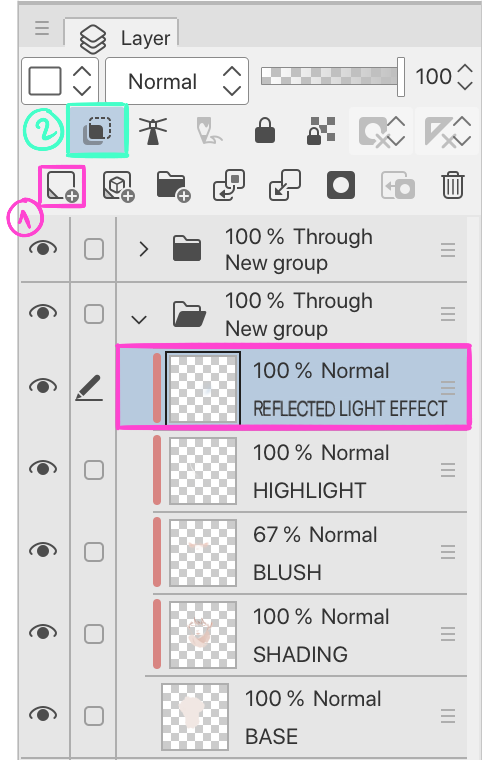
Create a new layer (REFLECTED LIGHT EFFECT) over the previous layer (HIGHLIGHT)
Click on the icon for Clip at layer below.
Step 2:
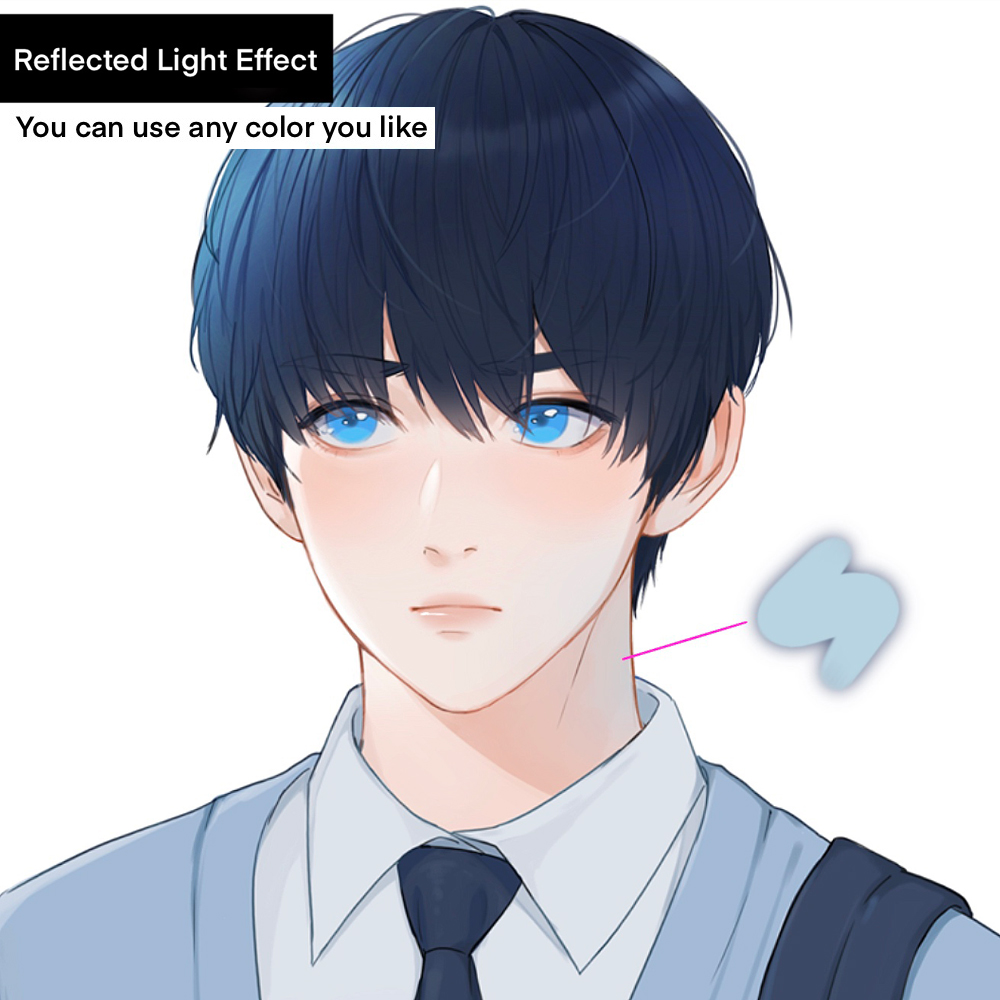
Pick the color. For the reflected light effect, I choose the color depending on the drawing. This drawing is cold and has lots of blue in it, so I thought the blue light effect will suit it the best.
You can always use any color or even multiple ones! But always make sure that the tone you chose fits well to the skin tone!The light effect should always be a bit lighter than the area you’re going to add on.
Step 3:
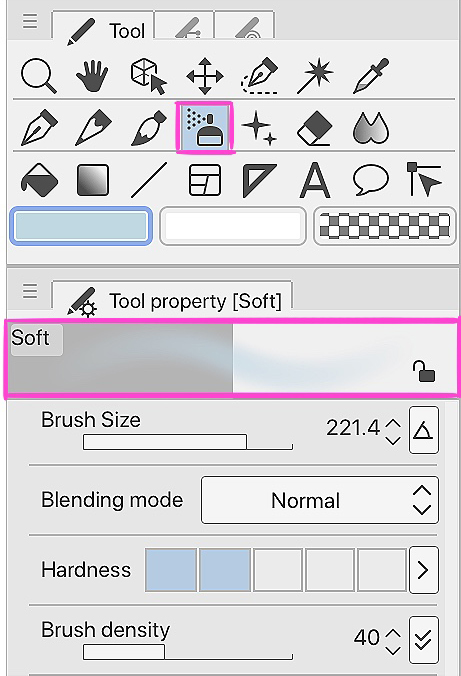
Choose your tool! For this step I’ll go with Soft Airbrush. I think it does the job perfectly. But again, you’re always free to try any brushes you want.
You can put this light effect on any part you like! I personally think it looks the best in the dark shading parts, which is the neck.
Different Skin Color Palettes
Here are 4 different skin palettes for you! There are way too many skin tones, so this is just a few examples. You can always create your own palettes and colors.
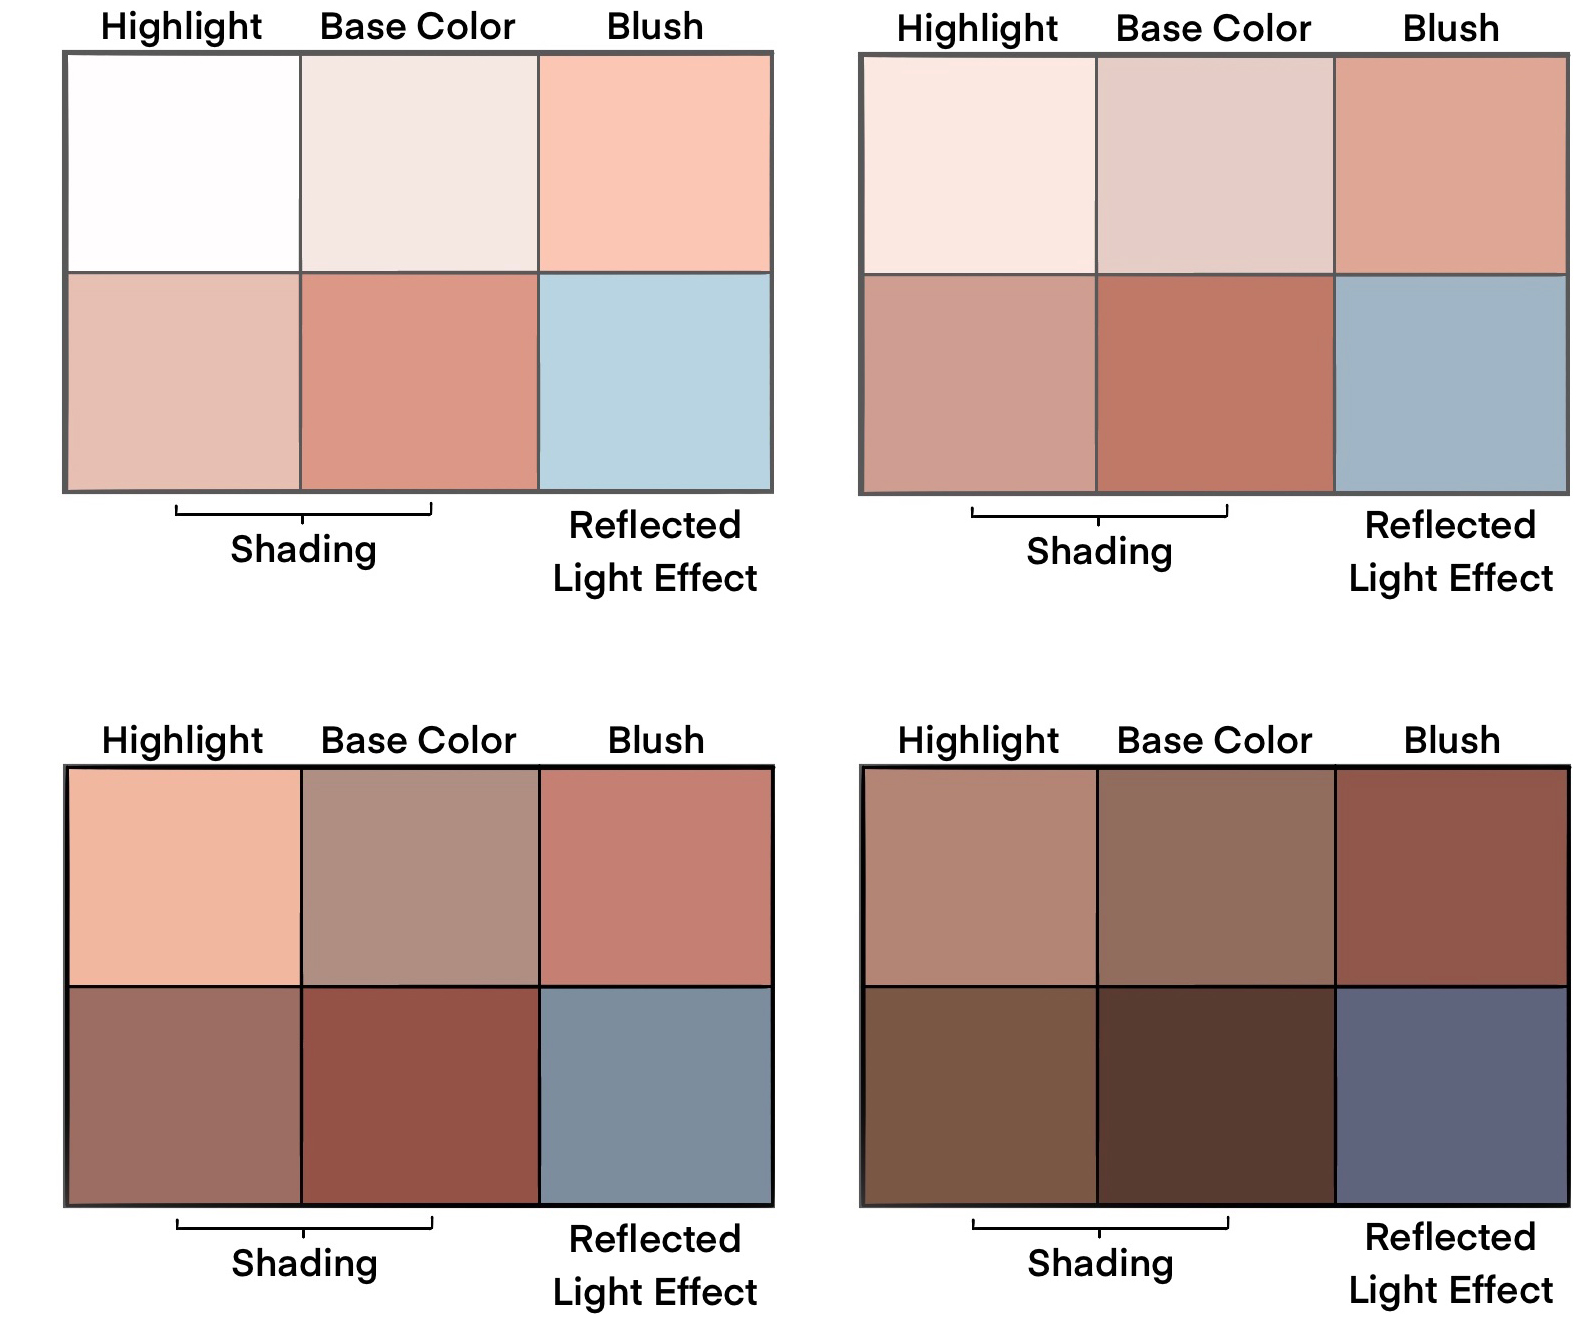
This is the end of my skin coloring tutorial! I tried to make it as simple as possible and easy for you to understand. I hope you learned new techniques and things today!
There is always more to learn and discover! Clip Studio Paint is definitely amazing and easy to use once you learn more about it.
Remember to practice a lot and have fun!
Artist Profile:
Nanniimo | Tasnim is a freelance artist specializing in digital and traditional pencil work. She has worked with companies such as XP-Pen, Skillshare, Amino and more.
Webtoon: https://www.webtoons.com/en/challenge/why-not-me/list?title_no=440820
Instagram: https://instagram.com/Nanniimo
Patreon: https://www.patreon.com/Nanniimo
Twitter: https://twitter.com/nanniimo
Interested in character art & design or what it takes to become a character designer?
Check out the link below!


